The original intention of the article#
The purpose of the blog is to write, not to showcase one's technical skills. Therefore, this article starts from the perspective of convenience and speed, introducing the charm of Hugo to beginners.
Preparation required#
- A computer that can quickly open GitHub (it is recommended to use a VPN, otherwise it is easy to lose articles)
- Learn Markdown (very simple, the recommended tool is Typora, zero learning cost, edit Markdown just like editing a Word document)

Building a blog#
- Visit CaiJimmy/hugo-theme-stack-starter and click Use this template to complete the operation as prompted.

- After completing the operation, click Code to create a new Codespace.

Configuring the blog#
Open Codespace and open the files in config/_default/, which is the blog configuration.
Modify config.toml#
Here are the places that need to be modified:
| Name | Operation required |
|---|---|
| baseurl | Modify to the URL of your own blog, format: (//) |
| languageCode | Modify to the language of the website, write zh-cn here |
| paginate | The number of articles displayed per page, keep it as it is |
| title | Website title, such as "Baidu" |
| DefaultContentLanguage | Supports en, fr, id, ja, ko, pt-br, zh-cn, zh-tw, es, de, nl, it, th, el, uk, ar. Fill in zh-cn |
Others can be ignored.
Modify menu.toml#
Modify it based on the basics.
Modify params.toml#
-
footer
since: Fill in the date of blog creation, such as 2023
customText: Custom footer text, see the footer of this site for the effect
-
dateFormat
No need to change, changing it may cause errors
-
sidebar
emoji: The icon in the lower right corner of the avatar, fill in an emoji
subtitle: A piece of text below the blog avatar, not too long
-
sidebar.avatar
local: Whether the avatar is local, if it is local, please fill in true!
src: Avatar link
Others can be ignored.
Deploying the blog#
Modify the deploy.yml in .github/workflows (create a new one if it doesn't exist), and fill in the following after deleting the content:
name: Deploy to Github Pages
on:
    push:
        branches: [master]
    pull_request:
        branches: [master]
jobs:
    build:
        runs-on: ubuntu-latest
        steps:
            - uses: actions/checkout@v2
            - name: Cache Hugo resources
              uses: actions/cache@v2
              env:
                  cache-name: cache-hugo-resources
              with:
                  path: resources
                  key: ${{ env.cache-name }}
            - uses: actions/setup-go@v2
              with:
                  go-version: "^1.17.0"
            - run: go version
            - name: Cache Go Modules
              uses: actions/cache@v2
              with:
                  path: |
                      ~/.cache/go-build
                      ~/go/pkg/mod
                  key: ${{ runner.os }}-go-${{ hashFiles('**/go.sum') }}
                  restore-keys: |
                      ${{ runner.os }}-go-
            - name: Setup Hugo
              uses: peaceiris/actions-hugo@v2
              with:
                  hugo-version: "latest"
                  extended: true
            - name: Build
              run: hugo --minify --gc
            - name: Deploy 🚀
              uses: JamesIves/github-pages-deploy-action@v4
              with:
                  branch: gh-pages
                  folder: public
                  clean: true
                  single-commit: true
Create a new branch

Click New branch

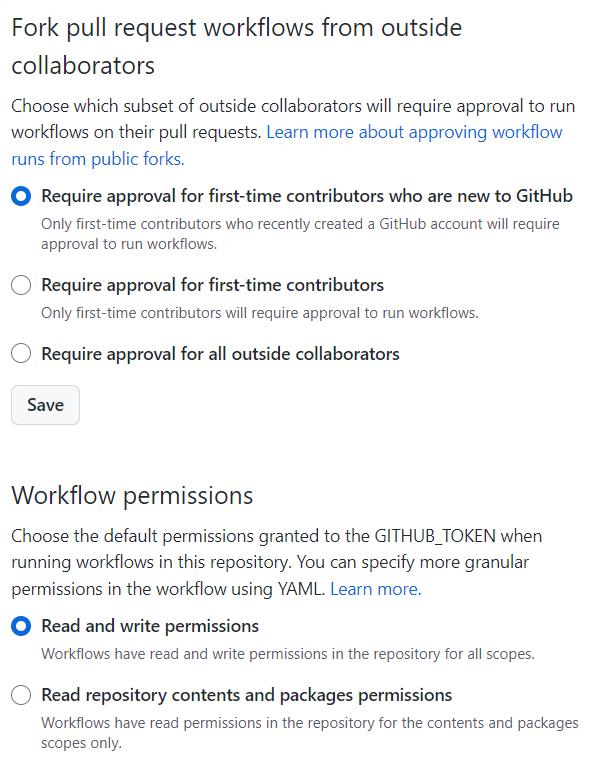
Open the repository > settings > Actions > General, modify as shown in the image
Upload to GitHub
Enter
git init
git add .
git commit -m "commit"
git push origin master
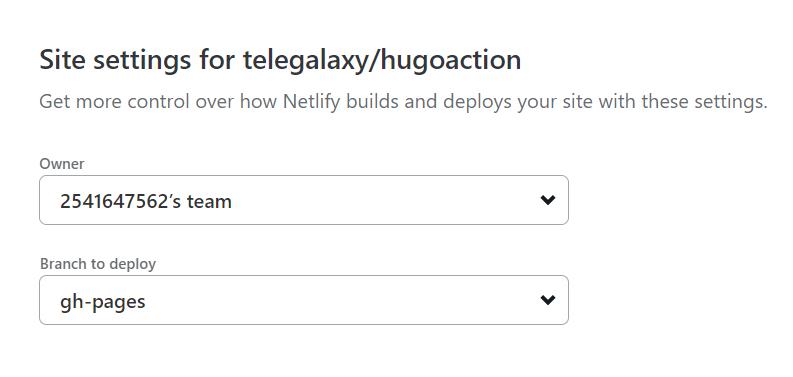
Deploy to Netlify#
First, register an account, then create a new site and choose to import from a Git repository.

Click on GitHub and wait for the pop-up window to display text, then close it and you will see the repository. Choose the blog repository and select gh-pages.
Others can be ignored, click Deploy site. You can see the blog by visiting the link on the homepage (you don't need to manually redeploy the blog every time you update it, the process is automatic).